.gif?width=670&height=335&name=KB%20article%20thumbnail%20images%20(1).gif)
How to Create a Venue Profile in MeetingPackage
Add Your Venue
-
After logging in, go to the "Venues" section from the left-hand menu.
-
Click "Add New" to create a new venue profile.
-
Fill in the basic information:
-
Venue Name: Use the official name.
-
Venue Type: Select the appropriate category (e.g., Hotel, Conference Center).
-
Currency: Select the currency your venue uses for billing (e.g., EUR, USD).
-
Customer contact email: Provide the main email for client communication and booking confirmations.
-
Meeting rooms Tax percentage: Input the applicable VAT or tax rate for meeting room services.
-
Phone number: Include your venue’s contact number (international format supported).
-
Business Hours: You can define your business hours, which are the times your event team is available to handle customer requests:
-
-
Use “Add time slot” to define:
-
Start time
-
End time
-
Weekdays of operation
-
-
💡 If you leave this section blank, the system assumes your venue offers 24/7 availability for bookings. -
-
- Continue to the next tab, Location, to enter your venue's physical address and map details.
Select Venue Facilities
Once your venue is created, you’ll be taken to the Facilities tab. Here, you can define what your venue offers in several categories:
General Facilities:-
Tick all applicable options such as:
-
24-Hour Front Desk
-
Free Wi-Fi
-
Business Centre
-
Ballrooms
-
Disabled Facilities
-
Elevator
-
Bar / Pub
-
Bedrooms
-
Concierge
-
Medical Facility
-
Helicopter platform / Helipad
-
-
Navigate across additional tabs to select:
-
Additional Services
-
Environment (eco-related features)
-
Sports & Recreation amenities
-
Tip: Be as thorough as possible to ensure your venue is accurately represented to potential clients.
Upload Venue Photos
In the Photos tab, you can upload high-quality media content to visually represent your venue:
Uploading Images
-
Click "Choose files" to upload photos from your computer.
-
After selecting files, click the "Upload" button.
-
Uploaded images will appear in a list showing their thumbnail, file name, and an option to delete them.
Optional Media Enhancements
-
Add a 360 photo link: Paste a URL if you have a 360° view of your venue (e.g., from Matterport or similar platforms).
-
Add video embed: Embed a video to showcase the venue experience. Supported platforms include:
-
YouTube
-
Vimeo
-
Twitch
-
Dailymotion
-
Canal+
-
Youku
-
Coub
-
Wistia
-
Tip: Photos and videos create a strong first impression, use bright, clear, and professional visuals to increase booking confidence and appeal.
Click Next to proceed.
Define Venue Terms
In the Terms tab, you can set up your venue's cancellation policy and booking conditions. This section is especially important for venues accepting credit card instant bookings via Stripe.
Credit Card Instant Booking Cancellation Terms-
Define specific rules based on booking value ranges.
-
For each range, set:
-
Booking amount (e.g., up to €500)
-
Cancellation charge (% of total sum)
-
Cancellation deadline (number of days before the event)
-
-
Use "Add time limit" or "Delete time limit" to customize.
-
Enable the early cancellation rule checkbox to offer a grace period for free cancellations.
-
Define how many hours (e.g., 48h) after payment cancellations are free of charge.
-
Write detailed cancellation policies in the provided editor.
-
English is required as a fallback language.
-
Include:
-
Free vs. late cancellation
-
No-show policies
- etc.
-
-
Add cancellation conditions for bookings that come via RFP rather than direct credit card bookings.
-
Fill out the same editable text box with custom terms.
Note: Clear and transparent terms reduce disputes and increase customer trust.
Click Next to continue.
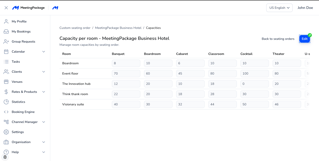
Add Meeting Rooms
In the Rooms tab, you can add, edit, and define key properties of each meeting or event space within your venue.
Adding Rooms-
Click the "+" icon to begin adding meeting rooms.
-
Enter a unique Room name for each space (e.g., Meeting Room 1, Large Event Space).
-
Use the checkbox to indicate whether the room is web bookable.
-
Configure Min - Max Number of Attendees to set capacity limits for the room.
Click Edit next to a room to configure the following settings:
-
Layouts and m2 Details:
-
Area (m²)
-
Height (m)
-
Width (m)
-
Length (m)
-
-
Seating Order Options: Define maximum delegate counts per layout:
-
Cocktail
-
U-shape
-
Boardroom
-
Theater
-
Classroom
-
Banquet
-
Cabaret
-
Island
-
-
Photos: Upload room-specific images or 360° photo URLs.
-
Description: Provide notes on the room’s key features (e.g., natural light, soundproofing).
-
Equipment: Specify available equipment, either included or for an extra fee. Examples include:
-
Microphone, LCD Screen, Flipchart
-
Air Conditioning, Natural Day Light
-
PA System, Paper & Pens, Projector
-
-
Combo Room: Indicate if this room can be combined with others for flexible setups (e.g., Connected Ballrooms).
Tip: Use the "Edit" buttons across each category to define details room-by-room. Use the trash icon to remove a room.
You can also add custom seating styles from organization settings
Click Next once you have configured all the rooms you want to list.
Add a Venue Description
In the Description tab, you can either write your own venue summary or use the automatic generator based on the information you've already entered.
Manual Description-
Use the editor to create a unique, engaging summary of your venue.
-
Highlight:
-
Unique selling points
-
Ideal types of events
-
Accessibility or sustainability features
-
-
Select a supported language (e.g., English US) from the dropdown.
-
Click "Create Text" to auto-generate a description based on your existing venue data.
-
The generated text can be modified before saving.
-
The description is automatically updated whenever you make changes to the venue's core information.
Submit for Publishing
Once all sections are completed and your venue has been created, it will appear in the My Venues list.
-
Publishing is not automatic.
-
Your venue will remain unpublished until it is requested and then reviewed.
-
You need to request publishing from the three dots or notify your Customer Success Manager to review and publish the profile.
-
Once your profile is verified and approved, the status will be updated from Pending to Published.
Once approved, your venue will go live on the Marketplace and GDS partner platforms.
For further support or detailed step-by-step guides, visit our Knowledge Base or contact our support team.